Showing posts with label facebook tricks. Show all posts

Guide to change your blogspot.com to dot.tk in Blogger

Are you publishing your blog with Blogger.com? Are you feeling that your long domain name like your-blogname.blogspot.com, giving you bad reputation at many points of view? If your answer is yes! Then you came to right place and read out my post....

Why should I change to custom domain?

Search engines except Google, rest of all will never result your blogspot well at their listing. Social networking sites don’t like your blogspot.com tag when compared with top level domain. They don’t love to back link you. Moreover, the blogspot.com domains are blocked by some Internet service providers including China. You can also get custom e-mail like admin@your-domain.com with Google Apps. So this time, I am posting step by step guide to set up a custom domain using Dot.tk.

Guide to set up a Dot Tk custom domain using free DNS service:

Registering Dot Tk Domain:

Step-I:
  1. Go to Dot.tk website.
  2. Enter your preferred Dot Tk domain name and click Go. If entered domain is available, you will be promoted for further steps.
  3. Dot Tk domain registration panel
  4. Now it shows availability of your domain.  For free domain you need to produce minimum of 25 hits per 90 days. Free domain has same services as paid domain. Select your choice and move on to next step.
  5. Dot tk sign up
  6. Enter your blogspot URL and set registration length as 12 months. Now sign up with Dot Tk. Here you have to verify your Dot Tk account by email or you can also use social Networking accounts like facebook, yahoo, flicker etc.

Dot Tk settings in Blogger:

Step-II:
  1. Log on to your blogger account.
  2. Adding custom domain
  3. Go to Settings and find Publishing option in your dashboard. Now click on Add a Custom Domain. You will be prompted to buy a domain for your blog.
  4. Blogger custom domain settings
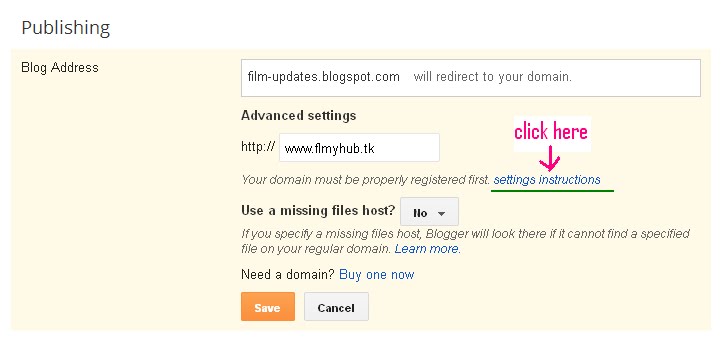
  5. Simply click on Switch to advanced settings. Then enter your Dot Tk domain with www in the place of www.filmyhub.tk (as shown in the picture). Now you have to verify domain ownership by adding two CNAME records. For this, click on Settings instructions. You will be landed to a page that having dynamically generated CNAME valus with detailed set up instructions.

DNS Configurations in Dot TK:

Step-III:
  1. Now log on to your Dot Tk account and click on Domain Panel. It gives the list of your Dot Tk Domains. Now, click on Modify option to configure DNS Settings for your domain.
  2. DNS settings in DOT TK
  3. Here, you will get a pop up window of Domain settings. Select Dot TK DNS Service and configure your DNS settings like above shown screenshot according to your domain name. You will find dynamically generated CNAME values in below image. 
  4. DNS settings in Blogger
  5. For the first CNAME, enter Host Name as "www" and IP address as "ghs.google.com". It is fixed for any blog. Second CNAME record needs dynamically generated values. It means Host name with dynamically generated name (which is highlighted in blue) and IP Address with dynamically generated value like "gv-xxxxx.domainverify.googlehosted.com" (which is highlighted in pink). These fields are different for different blogs. Do not forget  to select record type as CNAME record.
  6. To make your naked domain available, you have to add A record with following details. select record type as A record, then fill Host Name field with your dot tk domain without www (example: filmyhub.tk ) 
  7. You'll need to create four separate A-records which point to four different Google IPs.
    216.239.32.21
    216.239.34.21
    216.239.36.21
    216.239.38.21
  8. Before you move onto next step, wait about 30 min or an hour for your DNS settings to activate.

Saving Custom Domain settings in Blogger:

Step-IV:
  1. Again go to advacned settings that configured in second step under publishing and save them. If you get any error, come back after some time and save settings.
  2. custom domain settings in Blogger
  3. Once you are done with saving, under publishing edit your custom domain and set redirection option by putting tick mark as shown in picture.
  4. If you have any trouble in following any step, put a comment that helps me to catch you back.
HOW TO GET YOUR FACEBOOK PAGE VERIFIED WITH BLUE BADGE.

HOW TO GET YOUR FACEBOOK PAGE VERIFIED WITH BLUE BADGE.

Facebook Page Verification trick or method also submission URL or Link everyone need now days, Get Verified logo for your business page or fan page not easy, If you know right method for send or Submit a Facebook fan page for verification than you can easily get verifies logo, This social site always changing or update there terms and policy, Now days its verifying peoples account and pages for more identity proof,  
Facebook is free site using internet connection everyone can make Facebook profile easily without giving any identity proof, So people are making unlimited fake profile and fake pages of celebrities, Plays, singers, Politicians, Actors and most popular peoples, So after this against peoples appearing this problem that which is right or official page or profile of that celebrity,actor or any players,  So get ride on this problem people this social networking site launch this program and now its very useful for all.

How Can I Verify My Facebook Business page?

You know every social networking site’s are now a part of online marketing, Now days every social site are getting big percentage of advertisement, They earning much money by promote your online business, Facebook is top on this list, Its also against to Google in make money, Actually Facebook is world wide site, Most people using daily there account, So its biggest choice of online marketers,  If you wanna get ride on Marketing than you must create a business page and after than verifies it without verifies your business page not look professional, I wanna say you that Business page is easily verifying now days, If are you promoting your Business using Business page by there premium service  than they will quickly verify. So its also benefits for you if are you using business page.
Facebook Page Verification trick method image photo
 

Requirement for Verify Facebook Page For Logo

Before you Submit your fb fan page for Verification you must know some there requirement, Actually its must need a professional look, So fb don’t accept any half information’s page, They need to verify complete page with the right information and your own Facebook page cover and profile picture, Also need complete information about your work or business, Right working contact information also many, So first you must complete requirement for verification a fb page reading below article.

How many Likes Need For Facebook page Verification

Many people think that Submit before Verification a Facebook page need more likes, Actually some are thinking like 100k but I wanna say you that Likes are not issued for Facebook page Verification There are no one any likes requirement submit a page for Verification, So don’t worry you can send or submit verification request on any likes but must be above 5k likes because it look favorable.

Video Tutorial For Facebook Page Verification

Guy, we are trying to share complete steps with proper supporting screen shot, May be you will not get any problem to complete this method, If you are unable to complete this method then please watch our YouTube video tutorial for this, and understand with better.

How to Submit My Facebook Page for Verification Get Verified Logo

Before are you going deep in this tutorial i wanna give you some information that now days Facebook is only giving this feature for biggest celebrity and players, and politicians, But you can verify by Submitting a business page by advertising issue,  using this method we are about introducing our business page problem before promote, Actually we say that I  need to verify my fob business page before promoting this

  • First, you Must Go To this Link
  • Personalized Support For New Advertisers.

Facebook Page Verification trick method image photo

  • Now Fill Your Name, Email and all Information.

Facebook Page Verification trick method image photo


  • Email must be professional, like Support@mahendra.com

Facebook Page Verification trick method image photo
 
 
  • Then click on Submit and done.
  • Just ask to Facebook That before Choosing Advertising program i wanna Verify my Page.
  • Without verifying or verification I can’t buy Advertising from Facebook.
  • After this Facebook will contact you for verifying.

Code to Invite All Facebook Friends With A Single Click 2015

We know Facebook is the best way to promote any kind of event or any page,  we all create different  pages and events on Facebook but the problem we face is that we don't get enough members or likes.  So we invite all our friends one by one,  but again this is not easy as inviting all your friends one by one will take a  large amount of time.

To save this time which people waste on inviting their  friends I have come up with some scripts. There are some more codes and scripts available on net but those does not work now as Facebook has changed its layout. This trick is latest 2015 edition code without any problem.  Now lets get started.

Note that this works only on Google Chrome browser.


1. First of all open the page where you want to invite all your friends.  Open invite friends option,  a popup  opens. 
2. Now right click and choose inspect element option.  Click on console box as shown in screen shot .
3. Now copy the code given below and paste it in the console window. Press enter. For page invites use the page code and for event invites use the event code given below .


Code to Invite All Facebook Friends With A Single Click 2015
FOR PAGES
 var inputs = document.getElementsByClassName('uiButton _1sm'); for(var i=0; i<inputs.length;i++) { inputs[i].click(); }


Alse Read : Best Facebook Tips and Tricks 2015

FOR EVENT
 javascript:elms=document.getElementsByName("checkableitems[]");for (i=0;i<elms.length;i++){if (elms[i].type="checkbox" )elms[i].click()}


It will automatically invite all your friends to your page with just a single click. If you have a long list of friends then this may utilize more time and the page may look unresponsive for some seconds. You can use this code to invite all your friends to any page or event, and it does not come in spamming so don't worry, Facebook won't do anything with your account.

DISABLE RIGHT CLICK ON WEBSITE AND BLOG WITH STYLISH IMAGE

If you have a website or blog then you always want to prevent users and other bloggers from copying contents from your website or blog.You may be written an article with great efforts and lots of research and other peoples or bloggers just copy paste it on their websites or blogs.To prevent such type users and bloggers from copying content from your website i will show you a javascript trick to disable right click on your website or blog with stylish image.So let's started without waisting the time.Follow my instructions carefully:

Screenshot:


  • First of All Login to your Blogger Account

  • Now Go to Blogger Dashboard >>Template>>Edit HTML

  • Press CTRL+F and Find </head> tag in your template.

  • Copy the following javascript and paste just above the </head> tag.


  • <script type='text/javascript'>
    var DADrightclicktheme = 'Dark';
    var DADrightclickimage = 'http:https://blogger.googleusercontent.com/img/b/R29vZ2xl/AVvXsEgbu8Wl0WkDFdfpayUNp1XciUIvzR9OTJR3VT9_Jzdn2aWYu0jJRVZoD0UNvizOAG5XJroegbc9kVT_waLBwxjhVUpZvmL13sXP4cZqFtyefUIevFXWKIqtth-LDCePM41Roi3giFOmD-6e/s1600/No+Right+Click+copy.png';
    </script>
    <script type='text/javascript' src="https://sites.google.com/site/antictrlu/DEBLIZER/AntiCopas.js"> </script>

  • Now Save your template and Visit your blog.
  • Facebook Id Finder Tool By Software DUCK

    Facebook Id Finder Online
    Welcome back users I am come with a new online tool.You've listen or find your facebook numeric id many times.Every Facebook profile,page or group has a unique numeric id.If you want to find your numeric id you use facebook id finder tool and after this you not need to visit any other site I am create a online tool called "facebook id finder tool" or "facebook group id finder tool" this tool is not only to find facebook user id you can also find facebook page numeric id and group id finder tool.Facebook ID Lookup Finder Search Tool is the unique tool.You just need to enter your facebook profile URL,page URL or Group URL in text box and press Find button to find your numeric id.You can also Look up Facebook Profile ID, Facebook Group ID needed for Facebook app development.


    Facebook Id Finder Tool By Software DUCK
    Enter URL

    Your Facebook id is give below:
    Extract group ID, page ID , profile ID

    How to Disable Blogger Redirection to Local Domains? || make your blog open olny in .com ||


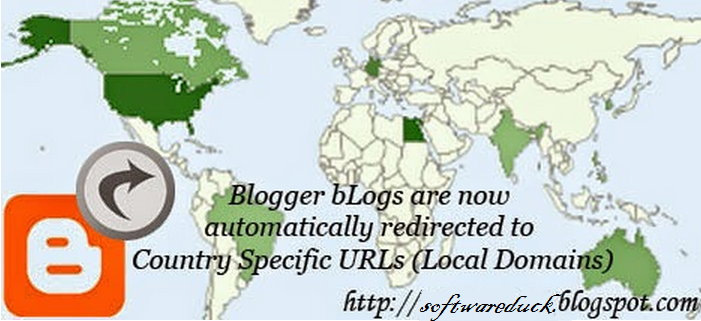
    If you're running a blog in blogger platform, you should notice, sometimes your site is redirected to local domains. I mean your site is redirected to country specific URL. But it doesn't happen in all countries. Maybe 15 - 20 countries have their own blogger domain. But Google will implement the local domains for blogger blogs in other countries very soon! 


    Let's give me an example: 

    You know the URL of Marks PC Solution is - http://softwareduck.blogspot.com
    • If you're Italian you will see my site's URL as- http://softwareduck.blogspot.it
    • A Canadian will see my site's URL as -  http://softwareduck.blogspot.ca
    • An Indian will see my site's URL as- http://softwareduck.blogspot.in

    Okay fine! Blogger has its own local domains for different countries. But what's wrongwith this country specific URL? There are a number of problems: 
    • Your social stats (+1, Likes, Tweets) may fall dramatically due to the variations in domain. 
    • Your search ranking might be affected. 
    • If blogger is banned in a country with the help of local domain, your site can't be visited from there!   
    Though Google says, they are trying to minimize the negative consequences of hosting blogger. But why are you waiting for Google's effort? You can force local domains to redirect to .com version of your site with a simple code! 


    Prevent Blogger's from Redirection: 

    Officially Google never mentioned any permanent way to stop redirecting. But it said if you type /ncr just after the domain name for example- http://softwareduck.blogspot.com/ncr, then it will not redirect to your local domain. 

    And if you want to do this for individual post then it should be like that: 
    http://softwareduck.blogspot.com/ncr/exaplepage

    Anyway, as a blog master your shouldn't let the visitors follow any boring way to prevent redirection. Because you can control the redirection by the code below! Okay let's try: 

    1. Make sure you're signed in to your blogger's control panel I mean design or dashboard.
    2. Now go to the template option. (Backup your template if necessary)
    3. Click on Edit HTML. Now you can see the code of your template. 
    4. Hit on the template box and Press Ctrl+F to enable search within the code box.
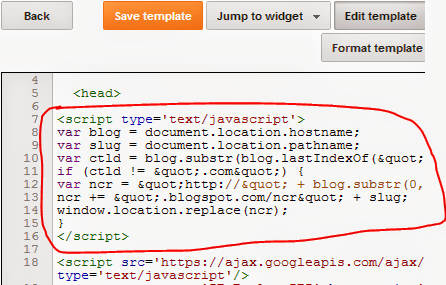
    5. find the <head> of your template and then copy the code below and place it just below the head tag. (Look at the image below)
    6. Save the template. Done! 

    <script type='text/javascript'>
    var blog = document.location.hostname;
    var slug = document.location.pathname;
    var ctld = blog.substr(blog.lastIndexOf(&quot;.&quot;));
    if (ctld != &quot;.com&quot;) {
    var ncr = &quot;http://&quot; + blog.substr(0, blog.indexOf(&quot;.&quot;));
    ncr += &quot;.blogspot.com/ncr&quot; + slug;
    window.location.replace(ncr);
    } <!-- softwareduck.blogspot.com -->

    </script>


    Prevent your blog from redirecting by a simple code


    From now and then your visitors will only be able to visit the .com version of your site. I mean like that: http://softwareduck.blogspot.com. 

    You can also test whether it works or not. Type http://softwareduck.blogspot.it in your browser. But it will redirect you to http://softwareduck.blogspot.com. Also check this for your site. 


    Removing the Code: 

    I don't think it is necessary. For any reason, if you are reluctant to use this code, follow the steps above again. And then at the 5th step, delete the code and save your template. Or if you have a backup of your template, you can also restore it. But deleting the code is much easier. 


    What about the Registered/ Custom Domain? 

    If you blogger blog is registered I mean if you have a custom domain like .com or .org you don't need implement this code. Because the redirection is not applicable for a site with custom domain. 


    What happened if blogger is banned in a country? 

    Naturally when blogger is banned by the Govt. of a country the visitors from that country will not be able to see your site. But they will be able to visit the .com version of your site by  using /ncr just after the domain. But if you use the above code in your site, visitors will automatically be able to visit your site!  

    I think now you understand the importance of using this code . . . :)