Showing posts with label blogger. Show all posts

Guide to change your blogspot.com to dot.tk in Blogger

Are you publishing your blog with Blogger.com? Are you feeling that your long domain name like your-blogname.blogspot.com, giving you bad reputation at many points of view? If your answer is yes! Then you came to right place and read out my post....

Why should I change to custom domain?

Search engines except Google, rest of all will never result your blogspot well at their listing. Social networking sites don’t like your blogspot.com tag when compared with top level domain. They don’t love to back link you. Moreover, the blogspot.com domains are blocked by some Internet service providers including China. You can also get custom e-mail like admin@your-domain.com with Google Apps. So this time, I am posting step by step guide to set up a custom domain using Dot.tk.

Guide to set up a Dot Tk custom domain using free DNS service:

Registering Dot Tk Domain:

Step-I:
  1. Go to Dot.tk website.
  2. Enter your preferred Dot Tk domain name and click Go. If entered domain is available, you will be promoted for further steps.
  3. Dot Tk domain registration panel
  4. Now it shows availability of your domain.  For free domain you need to produce minimum of 25 hits per 90 days. Free domain has same services as paid domain. Select your choice and move on to next step.
  5. Dot tk sign up
  6. Enter your blogspot URL and set registration length as 12 months. Now sign up with Dot Tk. Here you have to verify your Dot Tk account by email or you can also use social Networking accounts like facebook, yahoo, flicker etc.

Dot Tk settings in Blogger:

Step-II:
  1. Log on to your blogger account.
  2. Adding custom domain
  3. Go to Settings and find Publishing option in your dashboard. Now click on Add a Custom Domain. You will be prompted to buy a domain for your blog.
  4. Blogger custom domain settings
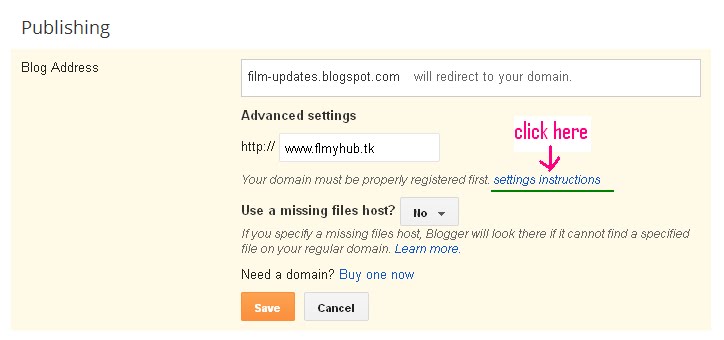
  5. Simply click on Switch to advanced settings. Then enter your Dot Tk domain with www in the place of www.filmyhub.tk (as shown in the picture). Now you have to verify domain ownership by adding two CNAME records. For this, click on Settings instructions. You will be landed to a page that having dynamically generated CNAME valus with detailed set up instructions.

DNS Configurations in Dot TK:

Step-III:
  1. Now log on to your Dot Tk account and click on Domain Panel. It gives the list of your Dot Tk Domains. Now, click on Modify option to configure DNS Settings for your domain.
  2. DNS settings in DOT TK
  3. Here, you will get a pop up window of Domain settings. Select Dot TK DNS Service and configure your DNS settings like above shown screenshot according to your domain name. You will find dynamically generated CNAME values in below image. 
  4. DNS settings in Blogger
  5. For the first CNAME, enter Host Name as "www" and IP address as "ghs.google.com". It is fixed for any blog. Second CNAME record needs dynamically generated values. It means Host name with dynamically generated name (which is highlighted in blue) and IP Address with dynamically generated value like "gv-xxxxx.domainverify.googlehosted.com" (which is highlighted in pink). These fields are different for different blogs. Do not forget  to select record type as CNAME record.
  6. To make your naked domain available, you have to add A record with following details. select record type as A record, then fill Host Name field with your dot tk domain without www (example: filmyhub.tk ) 
  7. You'll need to create four separate A-records which point to four different Google IPs.
    216.239.32.21
    216.239.34.21
    216.239.36.21
    216.239.38.21
  8. Before you move onto next step, wait about 30 min or an hour for your DNS settings to activate.

Saving Custom Domain settings in Blogger:

Step-IV:
  1. Again go to advacned settings that configured in second step under publishing and save them. If you get any error, come back after some time and save settings.
  2. custom domain settings in Blogger
  3. Once you are done with saving, under publishing edit your custom domain and set redirection option by putting tick mark as shown in picture.
  4. If you have any trouble in following any step, put a comment that helps me to catch you back.

DISABLE RIGHT CLICK ON WEBSITE AND BLOG WITH STYLISH IMAGE

If you have a website or blog then you always want to prevent users and other bloggers from copying contents from your website or blog.You may be written an article with great efforts and lots of research and other peoples or bloggers just copy paste it on their websites or blogs.To prevent such type users and bloggers from copying content from your website i will show you a javascript trick to disable right click on your website or blog with stylish image.So let's started without waisting the time.Follow my instructions carefully:

Screenshot:


  • First of All Login to your Blogger Account

  • Now Go to Blogger Dashboard >>Template>>Edit HTML

  • Press CTRL+F and Find </head> tag in your template.

  • Copy the following javascript and paste just above the </head> tag.


  • <script type='text/javascript'>
    var DADrightclicktheme = 'Dark';
    var DADrightclickimage = 'http:https://blogger.googleusercontent.com/img/b/R29vZ2xl/AVvXsEgbu8Wl0WkDFdfpayUNp1XciUIvzR9OTJR3VT9_Jzdn2aWYu0jJRVZoD0UNvizOAG5XJroegbc9kVT_waLBwxjhVUpZvmL13sXP4cZqFtyefUIevFXWKIqtth-LDCePM41Roi3giFOmD-6e/s1600/No+Right+Click+copy.png';
    </script>
    <script type='text/javascript' src="https://sites.google.com/site/antictrlu/DEBLIZER/AntiCopas.js"> </script>

  • Now Save your template and Visit your blog.
  • 5 Cool Recent Post Widgets for Blogger

    For bloggers that pride themselves on always staying up-to-date with new content, a recent post widget for Blogger can be an invaluable tool. A recent post widget for blogger is in many ways similar to a 'breaking news alert' that journalists love to use during their reports, providing the most recent and relevant posts that you have to offer.

    Adding a recent post widget for Blogger helps to reduce the dependency on email marketing, because you don't have to send out an email just to let people know you made a new post. Instead, it updates automatically for everyone to see. You can then use this information to design scheduled email newsletters, and take advantage of what's often referred to as the 'Twitter effect' where audiences will regularly check back on your site for the possibility that new posts are available. Without this, you force people to do run their own search for information and content, increasing the likelihood that they'll leave the site and hurt your bounce rate.

    Once you've managed to attract visitors to one of your posts using the recent post widget for Blogger, it will continue to act as an accessible secondary resource to navigate around your site. That way, you can avoid having them sifting through old content that might be outdated. If you'd rather show off some of your best posts instead of your most recent posts, you can do that instead, or add that feature to the bar with just a few alterations.

    Apart from looking great and taking up minimal space, there are too many benefits for you not to have a recent post widget for Blogger. The best part about these add-ons is that they come in a wide variety of designs that will fit any theme. If you're interested in adding a widget to your site, here are 5 cool recent post widgets that might catch your eye and fit perfectly with your Blogger template:


    Style #1

    rainbow widget, recent posts
    <script style="text/javascript" src="http://helplogger.googlecode.com/svn/trunk/helplogger/recentpoststhumbs.js"></script>
    <script style="text/javascript">
    var posts_no = 5;
    var showpoststhumbs = true;
    var readmorelink = true;
    var showcommentslink = false;
    var posts_date = true;
    var post_summary = true;
    var summary_chars = 70;
    </script>
    <script src="/feeds/posts/default?orderby=published&alt=json-in-script&callback=showlatestpostswiththumbs"></script>
    <a style="font-size: 9px; color: #CECECE; float: right; margin: 5px;" href="http://softwareduck.blogspot.com/2015/05/5-cool-recent-post-widgets-for-blogger.html" rel="nofollow">Recent Posts Widget</a>
    <noscript>Your browser does not support JavaScript!</noscript>
    <link href='http://fonts.googleapis.com/css?family=Ubuntu+Condensed' rel='stylesheet' type='text/css' />
    <style type="text/css">
    img.recent-post-thumb {width:50px;height:50px;float:right;margin: 5px -5px 0px 0px; border-radius: 100%; padding: 3px;background: #fff}
    .recent-posts-container {font-family: 'Ubuntu Condensed', sans-serif; float: left;width: 100%;min-height: 55px;margin: 5px 0px 5px 0px;padding: 0;font-size:12px;}
    ul.recent-posts-container {list-style-type: none; background: #fff;padding: 0px; }
    ul.recent-posts-container li:nth-child(1n+0) {background: #F49A9A; width: 100%}
    ul.recent-posts-container li:nth-child(2n+0) {background: #FCD092; width: 95%}
    ul.recent-posts-container li:nth-child(3n+0) {background: #FFF59E; width: 90%;}
    ul.recent-posts-container li:nth-child(4n+0) {background: #E1EFA0; width: 85%;}
    ul.recent-posts-container li:nth-child(5n+0) {background: #B1DAEF; width: 80%;}
    ul.recent-posts-container li {padding:5px 10px;min-height:50px; list-style-type: none; margin: 0px 5px -5px 5px; color: #777;}
    .recent-posts-container a { text-decoration:none; }
    .recent-posts-container a:hover { color: #222;}
    .post-date {color:#e0c0c6; font-size: 11px; }
    .recent-post-title a {font-size: 14px;color: #444; font-weight: bold;}
    .recent-post-title {padding: 6px 0px;}
    .recent-posts-details a{ color: #222;}
    .recent-posts-details {padding: 5px 0px 5px; }
    </style>

    Style #2

    recent posts widget
    <div class="recentpoststyle">
    <script src="http://helplogger.googlecode.com/svn/trunk/helplogger/recentposts.js"></script>
    <script>
    var posts_no = 5;var posts_date = true;var post_summary = true;var summary_chars = 80;</script>
    <script src="/feeds/posts/default?orderby=published&amp;alt=json-in-script&amp;callback=showlatestposts">
    </script><a style="font-size: 9px; color: #CECECE; float: right; margin: 5px;" href="http://softwareduck.blogspot.com/2015/05/5-cool-recent-post-widgets-for-blogger.html" rel="nofollow">Recent Posts Widget</a>
    <noscript>Your browser does not support JavaScript!</noscript>
    <style type="text/css">
    .recentpoststyle {counter-reset: countposts;list-style-type: none;}
    .recentpoststyle a {text-decoration: none; color: #49A8D1;}
    .recentpoststyle a:hover {color: #000;}
    .recentpoststyle li:before {content: counter(countposts,decimal);counter-increment: countposts;float: left;z-index: 2;position:relative;font-size: 20px;font-weight: bold;color: #fff;background: #69B7E2; margin: 15px 5px 0px -6px; padding: 0px 10px; border-radius: 100%;}
    li.recent-post-title { padding: 5px 0px;}
    .recent-post-title { font-family: "Avant Garde",Avantgarde,"Century Gothic",CenturyGothic,AppleGothic,sans-serif;}
    .recent-post-title a {color: #444;font-size: 13px; text-decoration: none; padding: 2px; font-weight: bold;}
    .post-date {padding: 5px 2px 5px 30px; font-size: 11px; color: #999; margin-bottom: 5px;}
    .recent-post-summ { border-left: 1px solid #69B7E2; color: #777; padding: 0px 5px 0px 20px; margin-left: 11px; font-family: Garamond,Baskerville,"Baskerville Old Face","Hoefler Text","Times New Roman",serif; font-size: 15px;}
    </style></div>

    Style #3

    recent posts gadget


    <script style="text/javascript" src="http://helplogger.googlecode.com/svn/trunk/helplogger/recentpoststhumbs.js"></script>
    <script style="text/javascript">
    var posts_no = 5;
    var showpoststhumbs = true;
    var readmorelink = true;
    var showcommentslink = true;
    var posts_date = true;
    var post_summary = true;
    var summary_chars = 70;</script>
    <script src="/feeds/posts/default?orderby=published&alt=json-in-script&callback=showlatestpostswiththumbs"></script>
    <a style="font-size: 9px; color: #CECECE; float: right; margin: 5px;" href="http://softwareduck.blogspot.com/2015/05/5-cool-recent-post-widgets-for-blogger.html" rel="nofollow">Recent Posts Widget</a>
    <noscript>Your browser does not support JavaScript!</noscript>
    <link href='http://fonts.googleapis.com/css?family=Oswald' rel='stylesheet' type='text/css'/>
    <style type="text/css">
    img.recent-post-thumb {padding:2px;width:65px;height:65px;float:left;margin: 0px 10px 10px; background: #fff; border: 1px solid #69B7E2;}
    .recent-posts-container {font-family: 'Oswald', sans-serif;  float: left;width: 100%;min-height: 70px;margin: 5px 0px 5px 0px;padding: 0;font-size:12px;}
    ul.recent-posts-container li {padding:5px 0px;min-height:65px; list-style-type: none; margin-bottom: 5px;}
    ul.recent-posts-container {counter-reset: countposts;list-style-type: none;}
    ul.recent-posts-container li:before {content: counter(countposts,decimal);counter-increment: countposts;z-index: 2;position:absolute; left: 15px; font-size: 13px;font-weight: bold;color: #fff;background: #69B7E2;padding: 4px 10px; border-radius: 100%;}
    .recent-posts-container a { text-decoration:none; }
    .recent-post-title a {font-size: 13px; text-transform: uppercase; color: #2aace3;}
    .recent-posts-details {margin: 5px 0px 0px 92px; }
    .recent-posts-details a{ color: #777;}
    </style>

    Style #4

    recent posts for blogger, cool widgets
    <script style="text/javascript" src="http://helplogger.googlecode.com/svn/trunk/helplogger/recentposts2.js"></script>
    <script style="text/javascript">
    var posts_no = 5;
    var showpoststhumbs = false;
    var readmorelink = true;
    var showcommentslink = true;
    var posts_date = true;
    </script>
    <script src="/feeds/posts/default?orderby=published&alt=json-in-script&callback=showlatestpostswiththumbs"></script>
    <a style="font-size: 9px; color: #CECECE; float: right; margin: 5px;" href="http://softwareduck.blogspot.com/2015/05/5-cool-recent-post-widgets-for-blogger.html">Recent Posts Widget</a>
    <noscript>Your browser does not support JavaScript!</noscript>
    <link href='http://fonts.googleapis.com/css?family=Oswald' rel='stylesheet' type='text/css'/>
    <style type="text/css">
    img.recent-post-thumb {padding: 2px; width:35px;height:35px;float:right;margin: -14px 0px 0px 5px; border: 1px solid #cea5ac; border-radius: 10%;}
    .recent-posts-container {font-family: 'Oswald', sans-serif;  float: left;width: 100%;min-height: 70px;margin: 5px 0px 5px 0px;padding: 0;font-size:12px;}
    ul.recent-posts-container li {padding:5px 0px;min-height:65px; list-style-type: none; margin: 0px 10px 5px 35px;}
    ul.recent-posts-container {counter-reset: countposts;list-style-type: none;}
    ul.recent-posts-container li:before {content: counter(countposts,decimal);counter-increment: countposts;z-index: 2;position:absolute; left: 5px; font-size: 16px;color: #4D4D4D;background: #F7F7F7;padding: 9px 14px; border: 1px solid #efefef;}
    .recent-posts-container a { text-decoration:none; }
    .recent-posts-container a:hover{color: #4DACE3;}
    .post-date {color:#e0c0c6; font-size: 11px; }
    .recent-post-title a {font-size: 13px; text-transform: uppercase; color: #5C4D4D;}
    .recent-post-title { margin: 5px 0px; }
    .recent-posts-details {border-top: 4px solid #AC707A; margin-top: 5px; padding-top: 5px;}
    .recent-posts-details a{ color: #888;}
    a.readmorelink {color: #4DACE3;}
    </style>

    Style #5

    recent posts, blogger gadget
    <script style="text/javascript" src="https://helplogger.googlecode.com/svn/trunk/helplogger/recentposts2.js"></script>
    <script style="text/javascript">
    var posts_no = 5;
    var showpoststhumbs = true;
    var readmorelink = true;
    var showcommentslink = true;
    var posts_date = true;
    </script>
    <script src="/feeds/posts/default?orderby=published&alt=json-in-script&callback=showlatestpostswiththumbs" rel="nofollow"></script>
    <a style="font-size: 9px; color: #CECECE; float: right; margin: 5px;" href="http://softwareduck.blogspot.com/2015/05/5-cool-recent-post-widgets-for-blogger.html" rel="nofollow">Recent Posts Widget</a>
    <noscript>Your browser does not support JavaScript!</noscript>
    <link href='http://fonts.googleapis.com/css?family=Lobster|Gloria+Hallelujah' rel='stylesheet' type='text/css' />
    <style type="text/css">
    img.recent-post-thumb {width:50px;height:50px;float:right;margin: -4px -35px 0px 0px; border: 4px solid #FCD6CB; border-radius: 100%;}
    .recent-posts-container {font-family: 'Gloria Hallelujah', cursive;  float: left;width: 100%;min-height: 55px;margin: 5px 0px 5px 0px;padding: 0;font-size:12px;}
    ul.recent-posts-container {counter-reset: countposts;list-style-type: none; background: #fff; }
    ul.recent-posts-container li:before {content: counter(countposts,decimal);counter-increment: countposts;z-index: 2;position:absolute; left: -20px; font-size: 16px;color: #616662;background: #FCD6CB;padding: 9px 14px; border-radius: 100%; margin-top: 15px;}
    ul.recent-posts-container li {padding:5px 0px;min-height:50px; list-style-type: none; margin: -2px 5px 5px 5px;  border-top: 2px solid #FCD6CB;}
    ul.recent-posts-container {border: 2px solid #FCD6CB; }
    .recent-posts-container a { text-decoration:none; }
    .recent-posts-container a:hover { color: #222;}
    .post-date {color:#e0c0c6; font-size: 11px; }
    .recent-post-title a {font-size: 14px;color: #616662;}
    .recent-post-title {padding: 6px 0px;}
    .recent-posts-details a{ color: #888;}
    .recent-posts-details {padding-bottom: 5px;}
    a.readmorelink {color: #4DACE3;}
    </style>


    How to Add Recent Posts Widget on Blogger

    Want to add one of the styles above? Just follow the following steps below:

    Step 1. Log in to your Blogger dashboard and click on your blog
    Step 2. Go to "Layout" and click the "Add a gadget" link on the right side
    Step 3. From the pop-up window, scroll down and select the "HTML/JavaScript" gadget:


    Step 4. Paste the code of the chosen widget found below it.
    Step 5. Hit the "Save" button... and that's it!


    Keep Your Blog Updated

    Using a recent post widget for Blogger can truly benefit you and improve your skill as a blogger. As you can see, these designs can look great on Blogger sites, but they do act a little bit like a progress report for the author. If you start to fall behind, the dates on your recent post widget will definitely give you away.

    Set a schedule and make sure that you are making regular posts on the blog. These posts will be automatically updated on your widget and readers can view this information whenever they want. Add your recent post widget for Blogger on the every page of the blog or in your template so that these posts can encourage others to continue reading, thus increasing the total time spent on your site. 

    Remove Footer Credit Link from Blogger Template without Redirecting to Any Website

     Many websites like templateism, templateify, waythemes etc. are available on the internet which provides very stylish blogger template at very low cost. If you purchase their template than that template will not contain any credit link. These websites also provide most of the free blogger template with Non-removable credit link. Means, what? If you'll try to remove credit link from their template, then your blog will automatically redirect to their website (Homepage or a particular site). This is because they added some JavaScript into their free templates. In other hand, if you undo the changes and keep their original credit of template then it works perfectly.
    Some days ago, I have visited one of these types of Blogger template websites where I have seen what? that some peoples (newbies blogger) are requesting how to remove credit/footer link from their template and the admin and other staff members are making jokes of that requests which result in creation of this topic.
    Basically, newbies blogger don't want to invest money in purchasing any premium template and thus, use these types of free template for their blog. Many of them are trying to remove credit link but unsuccessful, if you are one of them then no need to wait more. Because here I have shared the method by which you can remove footer link and stop redirecting to any website.

    How to Remove Credit Link?

    Actually, these links are attached with some JavaScript or CSS. Finding JavaScript from the template and then removing is too boring and time-consuming also it requires lot's of effort to do this. But in other hand, you can easily hide the credit/footer link via CSS. This method is very simple and takes only 2 minutes.

    Steps to Remove Credit/Footer Link:

    • First of all go to Blogger.com
    • Just Login to your Blogger Profile and select your blog.
    • Now go to Dashboard > Template > Edit HTML.
    Edit Blogger Template
    • Go to the footer and find the credit/footer link which needs to remove/hide. You'll find something like Copyright, credit or designed etc (Like the picture shown below).
    Find footer credit link
    • Add the following line with your original copyright ID. (As shown in picture below).
    style="visibility: hidden"
    Remove / Hide Footer Credit Link of Blogger Template
    • Now, you need to Save your Template.

    Conclusion:

    Some of you are searching on the internet how to remove footer credit link and convert free blogger template into premium. So, I hope this tutorial helps you. Share your idea/suggestion/feedback related to articles I publish here. Thanks, and stay tuned.

    How to add a gadget/widget inside your Blogger Blog header

    Some of you have noticed that many blogs have AdSense Units or other ads and widgets in the header section of the blog, one of the most popular format being the AdSense 468x60 ad unit. Unfortunately, we are not always able to add a widget inside the blogger header as a Blogspot user. The reason is that if we are using the Blogger default template, or any other customized template available on the internet, the header may be locked and have no option to Add a gadget inside it or just next to the blog title.
    The reason why some bloggers are using AdSense ads or different widgets in a blog header is because of its maximum of number of impressions. For instance, when a visitor goes to a page, this will be the first place where he would give a first look and this makes it one of the hottest spots in our blog.
    But how we can add something inside blogger header - be it a Adsense unit, a search bar, social sharing buttons, or a widget? By simply adding a section in the blog's header. First off, to give space for the extra gadget to fit in, our blogger header should be resized.
    Important! Before anything, we need to make a back-up of our Blogger template so that if we do make any major errors, we can easily restore the original working template to our blog.

    To make a back-up, go to Template and on the right side - click on the "Backup/Restore" button.

    Clicking on this button, will prompt you to save your existing template as an XML file to your hard drive. You can change the name of the file and choose the location to ensure it is easy to find if you need to use this later.

    Resize blogger header


    Step 1. Go to Blogger Dashboard, click on Template > Edit HTML
    Step 2. Click anywhere inside the code area and open the search box by using the CTRL + F keys:
    adsense, blogger tricks, blogger widgets

    Step 3. Add this code inside the search box, then hit Enter to find it:
    <b:section class='header' id='header' maxwidgets=
    Note: If you can't find it, make sure that you have no space at the beginning of it.
    Step 4. Replace class='header' with class='header header-left'.
    Step 5. Now we need to find - CTRL + F - the following line of code:
    <div class='header-cap-bottom cap-bottom'>
    And just above this line, we should see two div tags:
    </div>
    </div>
    <div class='header-cap-bottom cap-bottom'>
    Step 6. Paste the HTML code below just above these div tags:
    <div style='clear:both;'/>

    Now, let's go one step forward and add an extra gadget section within our Blogger header!

    Add a new gadget/widget element to the Blogger Header


    Step 7. Just above <div style='clear:both;'/> (step 6)... add this code:
    <b:section class='header-right crosscol' id='header-right' maxwidgets='1' showaddelement='yes'/>
    Step 8. Now find this tag:
        </head>

    Step 9. Just above the </head> tag, add this CSS styling:
    <style>
    .header-left{
    display: inline-block;
    float: left;
    }
    #header-right {
    display:inline-block;
    float:right;
    }
    </style>
    Note: if your widget is wider than overall area that both elements should occupy, then you might need to add the margin-right property to move it more on the right - see this example:
    <style>
    .header-left{
    display: inline-block;
    float: left;
    }
    #header-right {
    display:inline-block;
    float:right;
    margin-right: -20px;
    }
    </style>
    Step 10. Press the Save Template button to save the changes.
    Step 11. Go to Layout of your blogger blog and you should see two gadgets on the header area.
    You don't have to worry if the Add a Gadget element doesn't appear side by side as every blogger template is different. They might be slightly up or down or sometimes they might overlap each other. Just make sure that you drag the newly created widget just below the Header section.

    widgets for blogger, blogger tricks

    As I mentioned before, the header section could be one of the most valuable places in a blog. In that gadget/widget you can add anything like Adsense ads, search boxes, social sharing buttons, or you could, as well, sell that space for advertisement to boost your income.

    Add a Pinterest Pin It Mouseover Button on Blogger Images

    Images have always played a prominent role in attracting new visitors through search engines like Google and Bing. But when Pinterest decided to enter the social media mix, it upped the ante in a big way.
    Pinterest lets blog owners use their service to add a 'pin' to photos or content images on the site. When visitors of that site see a photo they like, they can choose to click on the red Pinterest button for Blogger, and add it to their Pinterest account.

    The person who pressed your Pinterest button for Blogger can now see your photo on their dashboard, and share it with friends or followers on the service. They can also come across this photo when users add keywords or category tags to the image. More importantly, that photo links to your site when clicked on and will contain a description title of your blog name or post.


    Therefore, adding the Pinterest button for Blogger will help you to benefit from tons of new traffic coming from Pinterest and people who had found your photos and post links using the service. Here are some steps to add your very own Pinterest button.

    1. Access your Blogger Template

    The first thing to do is to edit the code of your template so that it knows when to display this Pinterest Button for Blogger with the content. You can do this by logging into your Blogger Dashboard and finding your way to "Template" > "Edit HTML".

    blogger template html

    When the editor opens up, it may look a bit foreign to you if you don't have much experience using HTML. Click anywhere inside the code area and search by pressing the CTRL + F keys for the </body> tag - hit Enter to find it:
    </body>
    The body tags makes up the general content in your webpage. Think of it like the settings panel of a website. If you were to delete everything in this section your site would turn into a blank white page.

    2. Add The Pinterest Pin it Script

    Once you found the </body> tag, insert the following script just above it:
    <script>
    //<![CDATA[
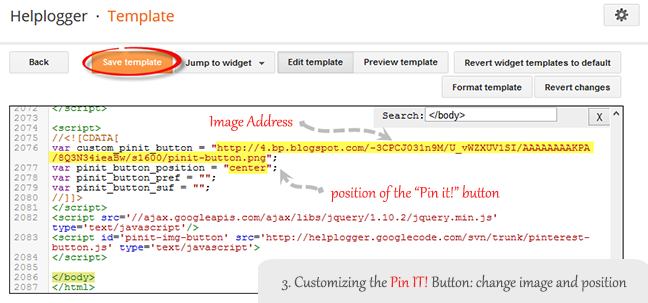
    var custom_pinit_button = "https://blogger.googleusercontent.com/img/b/R29vZ2xl/AVvXsEh6hd3EsDROM8PM29Oh_4KrhDaz0uKim8I16BvqrJPrVZ5si4F0LIRKvISBCX0LRkr2LHbWMK1dsM1R4W0m_b3UqLoSsx273xWbQKJCnSfkccKIxPaOR5Opajas3WHJFNGsQGdT1JzXY30B/s1600/pinit-button.png";
    var pinit_button_position = "center";
    var pinit_button_before = "";
    var pinit_button_after = "";
    //]]>
    </script>
    <script src='http://ajax.googleapis.com/ajax/libs/jquery/1.8.2/jquery.min.js' type='text/javascript'></script>
    <script id='pinit-img-button' src='http://helplogger.googlecode.com/svn/trunk/pinterest-button1.js' type='text/javascript'>
    // Visit helplogger.blogspot.com for more widgets and tricks.
    </script>

    adding pinterest script

    3. Changing the Position of the Pin it! button

    The cool thing about this code is that you have some freedom over where the Pinterest button for Blogger will go over the image. Take a look at the code that you just copied and pasted into the HTML for the word 'center'.
    var pinit_button_position = "center";
    To move the pin to a different area of the photo, replace center with one of these texts:
    topleft
    topright
    bottomleft
    bottomright
    And to change the Pin it! button that appears on mouse over, replace the address in blue from above with your own:
    var custom_pinit_button = "https://blogger.googleusercontent.com/img/b/R29vZ2xl/AVvXsEh6hd3EsDROM8PM29Oh_4KrhDaz0uKim8I16BvqrJPrVZ5si4F0LIRKvISBCX0LRkr2LHbWMK1dsM1R4W0m_b3UqLoSsx273xWbQKJCnSfkccKIxPaOR5Opajas3WHJFNGsQGdT1JzXY30B/s1600/pinit-button.png";

    pinit script

    4. Save The Template

    Make sure that you added everything correctly, then save the template and navigate to a recent post that you made that contain images. Hover your mouse over the image and you should now see a red Pinterest button for Blogger displayed on the image. Test it out and see it how it works.

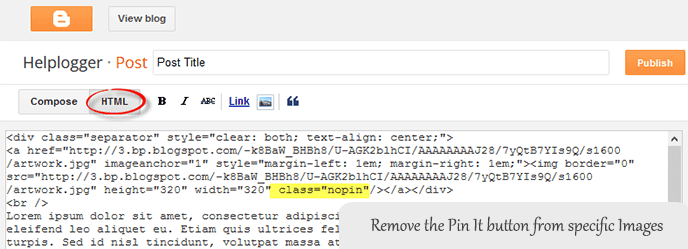
    If you want to hide the pinit button from a specific image, when you create a post, switch to the HTML tab of your post editor and type class="nopin" right before the closing slash and angle bracket of your image element, like this:

    nopin pinterest

    The only downside of this button is that it doesn't take the information from your custom image titles. It's automatically set to take the title of the blog post where the image is located. So, you'll need to pay closer attention to the title of the posts so that it fits closely with the images being shown.

    Remember that when you have this code activated, you have to label your titles so that they are relevant to the photos you are posting. This might sound obvious, but sometimes you create a post with an image as a joke that won't make sense in the context of viewing it on Pinterest.
    All ads code html to xml || Any Ads code converter

    All ads code html to xml || Any Ads code converter

    online HTML to XML parser | Blogger Any Ads code converter | escape tool

    This online converter will convert your adsense,chitika, adbrite and any HTML code into XML coding which are compatible with the blogger templates.


    Image result for html to xml
    This Adsense Parser / escape Online tool is Very Cool. Instead of Manually parse adsense code you can easily conver any html code to xml format. This tool are very easy and accurately escape tool which are hassle free parse the any html code. How To use ? when you enter html code in to above box parse code will be generated automatically just copy and past this code to your blogger use. 

    Adsense parser will make the google adsense, chitika, infolink, adbrite, adsforindian ad code converted to Encoded HTML code for adding in your blogger templates. Blogger templates don't allow html code in to xml templates so this tool are very important for every blogger user.